Jesse Claerbout talks about how to test the wire and capacitor at the outdoor condenser unit. If you're a fan of ours, be sure to share this video to show your friends and family how they too can experience “Simply Great Service!“
Don't forget to subscribe to our channel on YouTube or our Blog for automatic updates!
Links and Items Mentioned In This Video
- How to test Wires at the Outdoor Condenser
- How to test the Capacitor at the Outdoor Condenser
Transcript
So, what we're going to do here is we're going to check all the high and low voltage connections at the condenser unit, as well as the capacitor, contactor, and all the small components, such as the defrost board inside the condenser unit.
All right, so we're going to make sure our breaker is off, which it is. All right, so the power is off. Here, you got your high-voltage wires coming in. This is your contactor. Here is your capacitor. Here are your low-voltage wire connections. They all seem to be in good condition. None of them are broken off. That's good. Here, we got some connections on the defrost board. Make sure those are all snug. Here's your fan relay. Make sure that's on properly.
And then, you want to check for damaged wires going into here to the compressor. Make sure none of those have rubbed out. They all appear to be fine. Make sure all spade connections are good. Also, make sure all your high-voltage connections are tight, which they are.
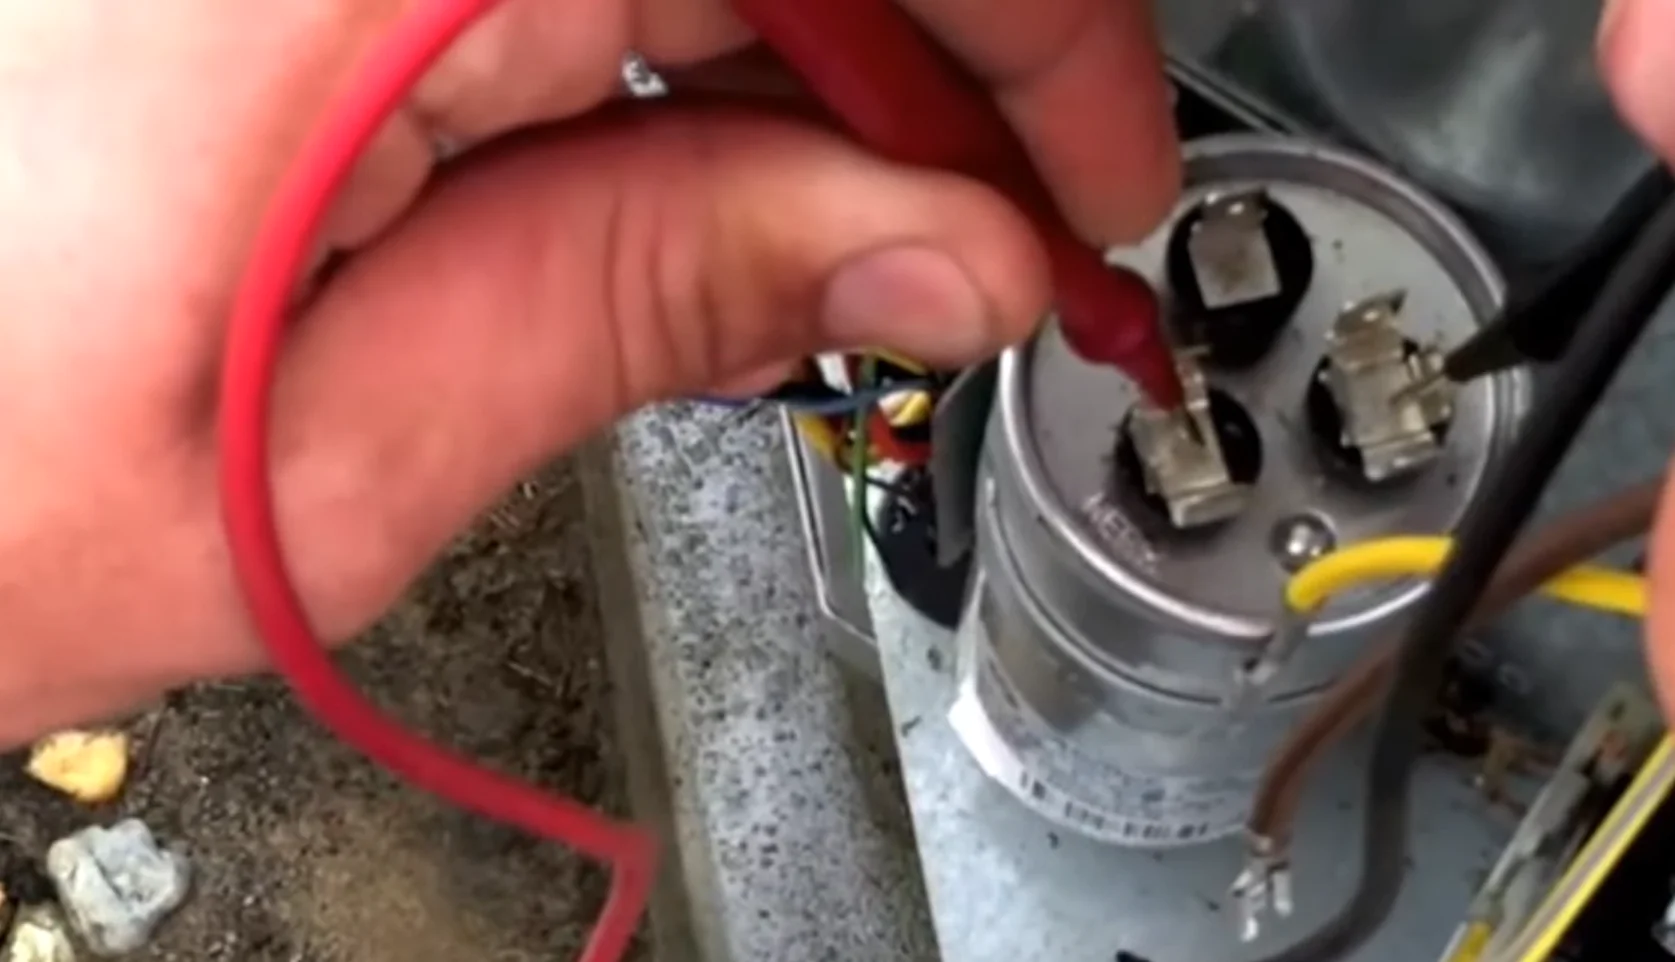
So, then we're going to check our capacitor. This is your herm—this is the one that goes onto the compressor. This is your common–those at the top of your contactor—cut that off. Those are your fan—cut those out of the way momentarily.
This is a multimeter. What we do is we test for microfarads, and on the capacitor, it says what it's supposed to be. Right here, it's a 45 x 5 uF. So, that means it's supposed to have 45 microfarads in between common and herm, which is for the compressor. So, you've got microfarads on the meter, and then you test in between common and herm, and you should have 45, give or take 6%. Common and herm, that takes a minute, and then the meter is reading 44.8, so that's within the 6% plus or minus range.
All right, then you go over from common, which is here to your fan, and we have 4.78. So then you want to put that all back together properly. Make sure your fan goes to fan, and it is marked on the capacitor as well. Your common, which goes to the contactor to the common, and obviously, you wanna make sure the power is off every time you touch any of the voltage. All right, here we go. And herm to herm, okay.
It's pretty much it. You want to check the contactor here. A lot of times, it gets worn out, so what happens is when it gets to 24 volts, it pulls in the contactor here, and you want to check to see if it's warm or there are any arc marks there that would cause it to have a poor connection. This one appears to be good.
Visit KalosFlorida.com or call (352) 243-7088 for more information!
More questions? Make sure to sound off in the comments or leave us a Voicemail. If you do, you might end up on our Podcast!


Do you have questions? We can help! Fill out the form below: